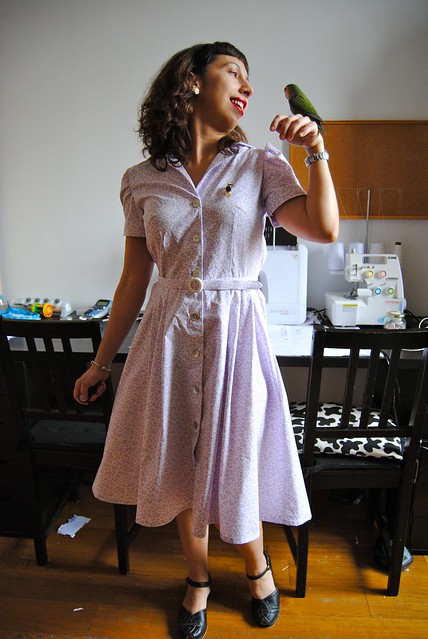
As very often happens, when I started this dress, I planned in my mind to finish it off in a couple of days to be able to wear it an event we were invited. I’m always such a naive! I also participated in the last “Fall for Cotton” and like that time, this project took me forever. I’ve been on the search for a shirtwaist dress pattern for a very long time. I had Gertie’s first book since it was released, but the shirring made me avoid this pattern until I saw Caroline’s version and she convinced me that I had to give it a try, that this was awesome.

I used some cotton poplin as I’ve already mentioned, which worked beautifully for the collar and it pressed nicely but the skirt feels a bit stiff. I still think that a more saturated color would have worked better.
I made a muslin to be on the safe side, mostly because as I’m petite, I was concerned about the waist placed correctly. Unexpectedly it was, but there was something weird happening with the shoulders. This was totally unexpected, since I’ve made Gertie’s 40s style blouse without alterations, and I was doing a size 4 here too. As I’ve read later, more people found the shoulders on this dress too wide. In my case I chopped off like 1 or 2 cm. As these are puffed sleeves, I didn’t alter the sleeve cup, but maybe I should, since there are some pulling lines over there.

This must be the year of the gathers for me. If you have followed me for a while, you may have realized that I never gather fabric (I have my personal reasons) but I think this is already my third project this year including gathers. I think the poplin doesn’t gather very nicely due to its crispness so next time I’ll go with my gut (as I should have done) and make a more traditional shirtwaist dress. Oh, well, at least I’ve learned something.

As I avoid making machine buttonholes like the plague (my machine never behaves) I made bound buttonholes. And I have to say that they look neat but they take time, steps and more steps, hand sewing and then more time again. They take a lot more work and time than machine buttonholes but at least there were neither tears nor swearing involved.

One of the reasons for which this dress took forever was the amount of hand sewing involved. Next time, if there is a next time, I’ll attach both yokes to the back using the burrito method. I just don’t get why we are required to hand sew the inner yoke: you take more chances at having it laying wrongly and it’s a freaking amount of work. I also like a lot more the armbands on the 40s blouse as opposite to this ones, and one of the reasons may be the hand sewing involved. I’m just very slow and I know from experience that hand sewing can leave you some ugly scars. This is partly why I machine hemmed the dress. I didn’t think this shape would benefit from adding petersham, and I was anyway doing a narrow hem, so to the machine it went. Before hemming it I cut off 4 cm, and I should point out that I raised the pockets by 2.7 cm, but I wouldn’t have hurt to raise them a little more.

And talking about the skirt shape, it feels somehow out of balance. I don’t know whether it is either a problem with this pattern or the fabric I used. It’s like the non-shirred fabric is pushing the pleated fabric at the hem. I think the pleats and shirring may not go very well together, but I could be wrong.
Something that I noticed is that I had to chop 5.5 cm of the facings, since they were longer than the skirt pieces. I don’t remember seeing this mentioned anywhere so it could be that I missed something in the instructions.
I had some purple buttons in my stash, but after checking with other sewcialists on Instagram, I finally purchased mother of pearl buttons, and I think I made the right call. I really like how they look on this fabric.

I went the extra mile and made a fabric-covered belt. I am not sure how belting looks like but this is what I got at my local haberdashery. The instructions are very straightforward and are also included in the book. I purchased a white plastic buckle at another shop and they claimed that they still have many things from the 40s in store. The buckle had a prong but I didn’t want to overcomplicate things even more so I removed it with a pair of pliers.

All in all I’m quite happy with this dress. It may have some flaws but I put quite an effort on it and I’ve learned new to me techniques: shirring, bound buttonholes and fabric-covered belts. I think in every craft you have to try things to really know what you want to make, and now I know that I want to make a shirtwaist dress with no shirring or gathers.

I want to thank Rochelle for organizing this Spring for Cotton and give us the opportunity to try to go beyond our limits and create unique garments.

I’m wearing here my first pair of Rocket Originals and I love these shoes. They are very comfy for not being flat, and they go wonderfully with vintage dresses.

A lo mejor la tela pierde esa “tiesura” en sucesivos lavados? Te ha quedado muy chulo con el cinturón y todo… La próxima vez te vienes a mi casa a hacer los ojales, tengo dos máquinas, digo yo que en alguna saldrá bien…y así nos conocemos y fundamos grupo frikicosturil ????
Cada vez que intento hacer un ojal quiero tirar la máquina por la ventana. Los de prueba suelen ir bien pero al hacer los definitivos es cuando falla. Te acepto la oferta, a ver qué ojales hacen las tuyas. Y si no, nos vamos juntas a ver telitas. Club frikicosturil ya!
Jajaaa vale! Justo después de mi comentario he leído tu post de la circle skirt… Y he visto lo del ojal de prueba perfecto y luego la catástrofe en la tela buena. Jiji que cabroncilla la máquina.
Supongo que es porque el definitivo suele ser en el extremo de la tela, y la máquina tiene problemas para arrastrarla bien. Conozco a más gente a la que le pasa lo mismo.
Yo he hecho la tremenda cantidad de… uno! jajaja pero salió bastante bien.En las dos máquinas son ojal en un paso. Bueno pues cuando quieras me pegas un toque, ya sea para ojal o mirar telas etc, lo que suceda antes 🙂
La mía también es de un paso
La mía también es de un paso pero casi preferiría que fuera de cuatro. En los vaqueros acabé haciendo el ojal con zigzag!
The dress fits beautifully. Your sewing skills are amazing. And you even made a belt!!
Thank you Andre Sue 🙂
Your dress is beautful. I love the pleats on the front of the skirt, and the fabric belt is a great idea. Wowsers to the bound buttonholes! They’re fab. I’d have been lazy, and made buttonholes with the zig zag stitch!
Thank you Lynne! I’ve used the zigzag stitch to make the buttonhole on my jeans, but I was not confident about making eight buttonholes like this. I was afraid that I couldn’t get them looking the same.
What a great dress! Love the retro touch 🙂
Thank you Dona! It’s definitely the style I was going for 🙂