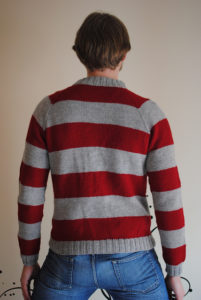
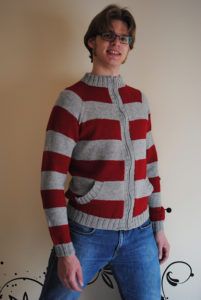
For I’ve finished Émilien, a cursed sweater and everything is still fine. After hours of thinking, measuring, re-thinking , modifying and trying, I finally got Koen’s cardigan done, we are still together and we love each other very much. He asked me for a sweater, seeing how much I love wearing my hand-knitted garments. We sat together, browsed Ravelry and he decided he wanted this cardigan.
The truth is it was almost finished one month ago, but I had to find a zipper in the perfect gray tone, I had to check how to put it on and I had to gather up the courage to do it.

I made this as part of 2KLC Kardigan KAL organized by the 2 Knit Lit Chicks.
First of all I would like to say that this pattern is so vague that I don’t understand why you have you pay 6 dollars for it. I would have expected this from a free pattern but not if you have to pay. If I pay I want the designer to guide me through it.
I measured Koen and I decided that I was going to do 7 stripes plus ribbing. Thanks to Mamatronic, I decided to make 21 rows stripes (instead of 22) to have an odd number and be able to weave in ends on both sides to avoid having an overloaded side.
I completely modified the sleeves, like in any sweater/cardigan I make. They looked enormous in many of the FO, and when I measured Koen’s arms and I saw that those sleeves will be to wide for him. I needed to adapt them. It was done like this:
- Started initially with 80 stitches. Those armholes are huge! If I were going to do this again I would CO less stitches on the shoulder part or make the increases in a different way.
- After measuring Koen’s arms, I decided to make decreases every 9 rows (ssk, k, m, k, k2tog).
- In the last row before ribbing (and with cuff color) I decreased 8 stitches (52 -> 44) by doing k4, k2tog until the end of the row. I’ve used smaller needles already for this row.
I’ve learned how to do jogless stripes for the sleeves.
In most projects, the last stripe before the ribbed cuff was narrower than the other ones. I quite didn’t like the effect and neither did Koen. Luckily he has long arms (he often has problems finding sweaters with long enough sleeves) and he needed a full red stripe there 😀
I picked 123 stitches on each front edge following the rule of thumb of picking 3 out of 4 stitches, and dropped one to have 122 (4x +2).
I decided to knit a long collar to be able to fold it and have it thicker and with more structure. Afterwards I’ve sewn it inserting the darning needle through each back purl loop (WS) and the two bind off loops.

Koen wanted pockets. I started them on row 2 of stripe 6 instead of row 3 because it was a knit row (due to my number of rows per stripe mod). I followed instructions doing M1R for left pocket and M1L for right. I’ve sewn the pockets to the sides using a mattress stitch.
I picked then 34 stitches for each pocket for the ribbing edge.
Used this method to sew zipper on. My sewing machine arrived this Tuesday, so I could finally do this!


Things I learned with this project:
- Knitting stripes (odd number of rows is better to have ends on both sides).
- Knitting stripes and ribbing (always change color for the row before the ribbing).
- Jogless stripes (to avoid a “jog”).
- Matress stitch (to make invisible joins).
- How to make a double collar (just knit double length, fold and sew).
Koen is so happy now with his new cardigan, and he’s amazed at how warm it is (yeah, his a warm kind of guy, always with short sleeves). He told me he’s afraid of wearing it and ruining it. Just the same feeling I have with my new knitted sweaters, but once I lose the fear I practically live inside them and I never wear the ones bought from the shop.
The sweater looks fantastic! Mattress stitch is one I struggle with. My joins never look invisible. Any advice?
It’s perfect! You fearlessly made all sorts of modifications to get it just right. I have been wanting o knit a Central Park Hoodie for years, but dread the whole zipper thing and so I haven’t. I’m going to check out that zipper tutorial- it might give me courage.
I have to announce that Koen was wearing his cardigan this morning when he left for work! Yeah! 😀
Anastasia, this is the time I tried mattress stitch and I have to say it came out perfect. I was afraid that you could see the joint there but it’s completely invisible. I’ve just followed the video tutorial. Just go under each loop alternatively on both sides: http://www.youtube.com/watch?v=NvAS-HCWk9I
Michelle, there are more tutorials where you don’t need to sew but you need a special tool to make holes on the zipper and then get the yarn through them. You also need to measure carefully for the holes. So I tried this one instead.
Another thing about zippers is that you have to check the length while holding the cardigan in a vertical position, like when you are wearing it, otherwise it can pull afterwards.
Oh great, thanks!